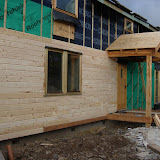
I awoke in the early hours this morning and wrestled with the best way to weatherproof the joints between cladding and window / door frames. In the end I decided to use a bead of silicon behind the cladding, and another on the front. This should provide a belt and braces. The front bead will be easy to inspect and maintain, and will prevent water ingress as long as it is in good condition. Any any water that manages to blow through if the bead gets damaged will be kept out of the straw cavity by the second bead, which, being behind and therefore protected by the cladding from UV and accidental damage, should remain in pristine condition for many years.
There's a pronounced bulge in the wall between the snug window and the porch, where the tightly stuffed straw has bowed the external (non-load-bearing) frame. This isn't a problem, either structurally or in terms of the weather-proofing performance of the cladding, and it lends the building a pleasing organic feel that sits well with the very rustic porch and verandah timbers. Shouldn't think Mal would be very impressed with the curves, but he's very much a straight-lines, stainless steel and glass man.
Speaking of stainless steel, the nails I'm using for the cladding are 65mm stainless steel ringshanks from Russwood. Galvanised nails are unsuitable because they cause nasty black staining when they react with the tanin in the timber, and ringshanks were chosen to provide good pull-out resistance. With the bulging walls this is essential, as the ends of the planks are under quite a bit of tension. It may be necessary in future, when the wood is under additional mechanical stress due to wetting and drying, to screw some of the board-ends. At the moment, though, the nails are holding.
Melvin's due back on site tomorrow, which should speed things up considerably.
 |
| 111107 |
No comments:
Post a Comment